
Embedded API
Get started

Our new Embedded API is the easiest way to integrate with VerifyInvestor.com. By pasting just a few lines of HTML code on your website, you can create a button that opens a modal window that allows your investors to complete the verification process on your own website. The modal window displays a subset of pages from VerifyInvestor.com in an iFrame with customized styling to integrate seamlessly with your site. You are free to retain the branding of your own site while taking advantage of all the features of the investor verification process as implemented on VerifyInvestor.com.
WARNING: Adding Embedded API to a Word Press site is not recommended. If you choose to try anyway we may not be able to provide technical support for issues related to Word Press's handling of iFrames from 3rd-party sites. The iFrame contents can be displayed if the Word Press site uses https, but there may be issues with auto-resizing and scrolling within the iFrame.
Setup and Authorization
Create your issuer account
Add host and settings
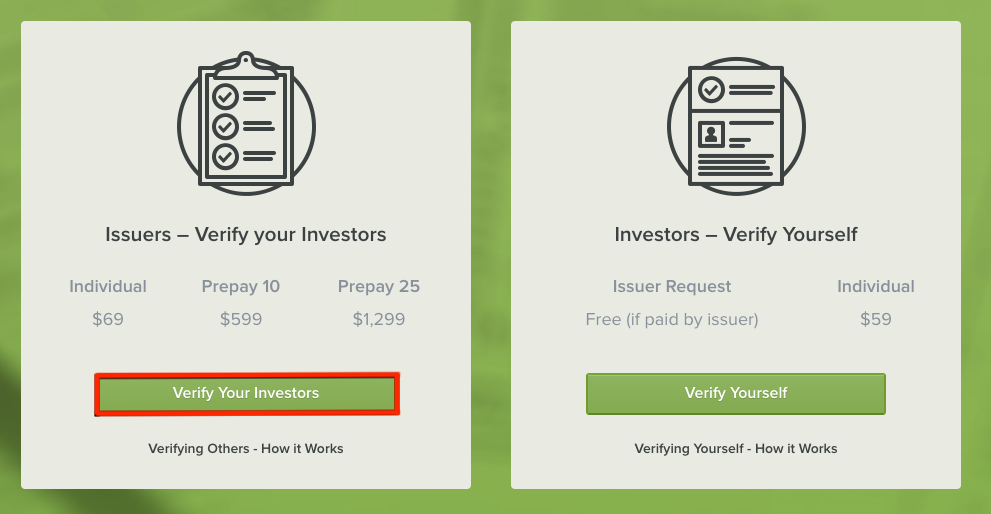
The first step in the setup process is to create an issuer account on VerifyInvestor.com. You may first set this up on our staging server to test your integration free of charge. To create an issuer account, click the white GET STARTED NOW button on VerifyInvestor.com. On the next page, scroll down and click the green Verify Your Investors button and create your user profile.
Once you have created your issuer account, contact accounts@verifyinvestor.com to enable the Embedded API for your account. After the Embedded API has been enabled, log in to your account and select settings from the user menu. You will see a new section in your settings where you can configure multiple websites to use the Embedded API under your issuer account.
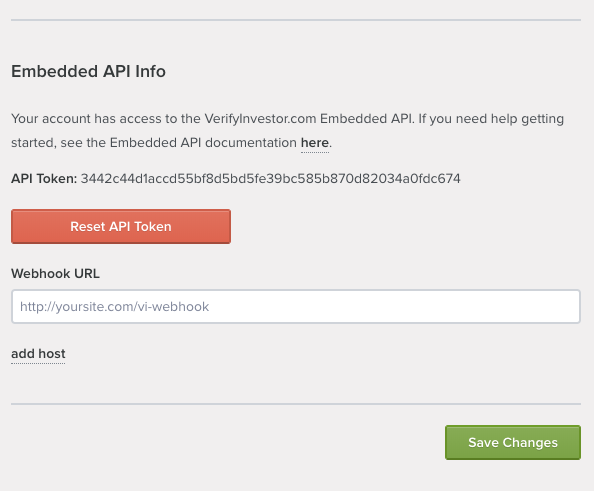
Click add hosts and settings to configure your first host to use the Embedded API. The image to the right shows all the settings that are available for each host.
Embedded API Settings
Configure host settings

Each of the settings in the image is explained below.
Token
The token is used when you invoke the Embedded API on your website. Each set of hosts configured to use the same style set will have its own token. The hosts and token tell VerifyInvestor.com who you are so we can authorize your site to display our pages in an iFrame with your configured styles. Click Reset Token if you need to generate a new token. Your previous token will immediately stop working.
Hosts
The hosts are the website URLs where you plan to integrate the Embedded API. This is required for us to set the appropriate response headers to authorize your site to display VerifyInvestor.com within an iFrame. You can setup multiple hosts to use the same token and the same set of styles. The hosts defined here should not include any path information. This is not the page where your integration lives, but only the host.
Custom Styles
The settings described in the table below allow you to customize the styles that appear in the modal window to match the look and feel of your website. The logo will display with a maximum width of 200 pixels and a maximum height of 50 pixels. To optimize loading time you can pre-format your image file to fit within these limits. For color fields, use an HTML color name or a 3 or 6 digit hex code. You can see the effect of each style choice in the samples to the right of these fields
| Setting | Description |
|---|---|
| Logo URL | The URL of an image to display in the modal header and optionally in investor emails. |
| Link URL | The URL where the investor is taken when clicking on the logo. |
| Font Family | The font for all text. Select from the list. |
| Font Size | The font size in pixels for all regular text. Select from the list. |
| Background Color | The background color of pages displayed in the modal window. |
| Text Color | The color of the text displayed in the modal window. |
| Primary Button Color | The color of the most common buttons. |
| Primary Button Text Color | The color of the text on the primary buttons. |
| Secondary Button Color | The color of special buttons such as cancel and special verification methods. |
| Secondary Button Text Color | The text color for secondary buttons. |
Custom Investor Emails
Configure investor email settings
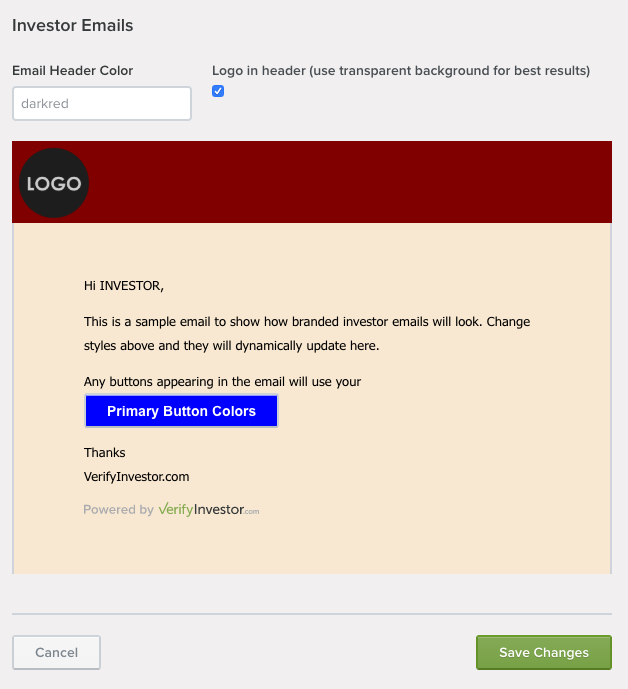
Most of the settings described in the previous section also apply to investor emails sent from VerifyInvestor.com to your investors. In addition, you can choose a color for the email header and optionally include your logo. Investor emails are sent when a reviewer determines that your investor is accredited, not accredited, or when the reviewer needs more information. The image shows the investor email settings and a sample email as they appear on your Embedded API settings page. The sample dynamically updates as you adjust your settings.
Adding Additional Style Sets
Hosts and tokens displayed on settings page
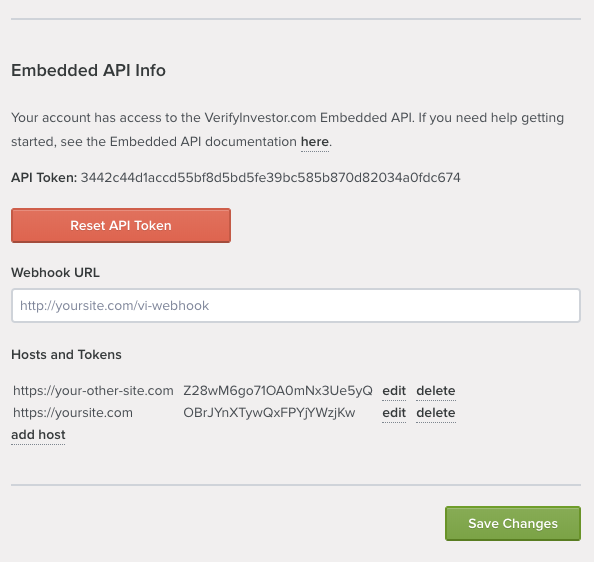
You can add additional style sets, each with their own token, by clicking on the green + and repeating the process described above. This allows you to set up as many different style sets as you wish. Each style set sharing the same token can in turn have as many hosts as you care to add.
Adding to Your Site
Copy the code below to your website to create a button that allows investors to verify as accredited investors. Replace YOUR_EMBEDDED_API_TOKEN with the token for your host. Replace YOUR_IDENTIFIER with any arbitrary value you want to use as a filter later to find this specific verification request. Replace YOUR_PORTAL_NAME and YOUR_DEAL_NAME with values that identify your investment or leave them blank if desired. Substitute https://verifyinvestor-staging.herokuapp.com/verify-investor-embedded-api.min.js for the src attribute in the script reference below if you are using your VerifyInvestor.com staging account. If AML/KYC, Qualified Purchaser, or Qualified Client verification requests are enabled on your account, you can use the
vr_typeparameter to control which type is created. Thelegal_nameparameter will prepopulate the investor's legal name, but the investor can still edit it unless your account is set to lock the investor's legal name.
<div class="text-center row col-lg-12">
  <button id="invest" type="button" class="nav-btn btn btn-primary">Invest</button>
</div>
<script async src="https://www.verifyinvestor.com/verify-investor-embedded-api.min.js"></script>
<script>
  const investButton = document.getElementById('invest');
  investButton.addEventListener('click', () => {
    const token = YOUR_EMBEDDED_API_TOKEN;
    const identifier = YOUR_IDENTIFIER; // optional
    const portal_name = YOUR_PORTAL_NAME; // optional
    const deal_name = YOUR_DEAL_NAME; // optional
    const vr_type = VR_TYPE; // optional ("ai", "qc", or "qp", default is "ai")
    const legal_name = INVESTOR_LEGAL_NAME; // optional
    window.verifyInvestor(token, identifier, portal_name, deal_name, vr_type, legal_name);
  });
</script>
Once you have configured your settings, you can add a button to each site to open a modal window and allow your investors to be verified without leaving your site. You will receive email updates from VerifyInvestor.com regarding the status of your investors' verifications. Your investors will also receive email updates, but investor emails will be styled with settings you configured in the previous section.
NOTE: The script src attribute must match the VerifyInvestor.com server where you have configured your integration. For production it should be https://www.verifyinvestor.com/verify-investor-embedded-api.min.js and for staging it should be https://verifyinvestor-staging.herokuapp.com/verify-investor-embedded-api.min.js.
Note that the CSS style classes in this example are only available if you are using Twitter Bootstrap. Substitute your own style classes as needed. Also substitute the token from your settings page for YOUR_EMBEDDED_API_TOKEN, and add values appropriate to your particular investment for YOUR_PORTAL_NAME and YOUR_DEAL_NAME. You may add multiple buttons to your page, each with a different portal name and/or deal name, and customize the button text.
YOUR_IDENTIFIER can be any arbitrary string that you want to use later as a filter to find this particular verification request or a group of verification requests. YOUR_IDENTIFIER will not be visible to the investor at any point in the process.
INVESTOR_LEGAL_NAME is the legal name of the investor who is being verified as an accredited investor. The verification request will be prepopulated with this as the legal name, but the investor can still edit it unless your account is set to lock the investor's legal name. If you do not provide a value for the legal_name parameter, the investor will be asked enter their legal name.
Qualified Purchaser, Qualified Client, and AML/KYC
If these types verification requests are enabled on your account, you can use the vr_type parameter to indicate which type you want to be created. Accepted values are "ai" (Accredited Investor), "qp" (Qualified Purchaser), "qc" (Qualified Client), and "ak" AML/KYC. If the vr_type parameter contains any value other then "qp", "qc", or "ak", or if these types are not enabled on your account, an Accredited Investor verification request will be created. AML/KYC verifications can be paired with one other verification type. To create only an AML/KYC verification request, set vr_type to "ak". To pair an AML/KYC verification with an Accredited Investor verification, set vr_type to "ak_ai".
Using the Embedded API on Your Site

The code shown on the right creates a button similar to the one shown below it. When the investor clicks on this button, the modal window will open to a page that allows them to create a VerifyInvestor.com account. If they already have an account, they can sign in instead. If they need to reset their VerifyInvestor.com password, they will be sent an email containing a link that allows them to reset their password, and then redirects them back to your site. Once your investor is logged into their account, they will be taken through the identical verification process as on VerifyInvestor.com without having to leave your site. All pages will be styled according to the settings you have configured on your VerifyInvestor.com account.
Capturing the modalClosed Event
Use the following sample code to setup a listener for the
modalClosedevent. This allows you to detect when the investor has closed the modal window by clicking theXin the upper right-hand corner.
window.document.addEventListener('modalClosed', handleEvent, false);
function handleEvent(e) {
    console.log(e.detail);
    // add your code here
}
When an investor closes the modal window, we fire a custom event called modalClosed. You can use this event to send the investor to the next step in your process. You may wish to follow up by checking the status of the verification request, as described in the next section, so you can determine whether the investor submitted the verification request or abandoned the process without submitting. If abandoned, they can resume by reopening the modal window and signing back into their VerifyInvestor.com account. You may use the sample code on the right as a starting point for capturing this event.
Checking Status
Get info for all verification requests created through your Embedded API integration. Replace
YOUR_API_TOKEN_HEREwith your API token from your settings page. Note that the token is not the same as the token that is passed to theverifyInvestorJavaScript function. The token can be found on your settings page with the labelAPI Token.
curl GET "https://www.verifyinvestor.com/api/v1/verification_requests?type=all" \
  -H "Authorization: Token YOUR_API_TOKEN_HERE" \
  -H "Content-Type: application/json" \
  -H "Accept: application/json"
The above command returns JSON structured like this:
[
    {
        "id": 43,
        "waiting_for_info": false,
        "portal_name": "MY PORTAL",
        "locked_investor_name": "INVESTOR ONE",
        "verified_expires_at": null,
        "deal_name": "MY DEAL",
        "api_type": "embedded",
        "identifier": "abc123"
    },
    {
        "id": 42,
        "waiting_for_info": true,
        "portal_name": "MY PORTAL",
        "locked_investor_name": "INVESTOR TWO",
        "verified_expires_at": null,
        "deal_name": "MY DEAL",
        "api_type": "regular",
        "identifier": null
    }
]
You will receive email updates from VerifyInvestor.com regarding the status of your investors' verification requests. You can also check the status on your dashboard when you log into VerifyInvestor.com with the issuer account you configured to use the Embedded API. In addition, we have 2 API endpoints you can use to check the status of all verification requests through your issuer account. To use these, you must generate an API token on your settings page. Note that this is a separate token from your Embedded API tokens and must be kept private. You should only use it from your back end over HTTPS.
Verification Request Endpoints
Get more detail for a single verification request. Replace
YOUR_API_TOKEN_HEREwith your API key.
curl GET "https://www.verifyinvestor.com/api/v1/verification_requests/43" \
  -H "Authorization: Token YOUR_API_TOKEN_HERE" \
  -H "Content-Type: application/json" \
  -H "Accept: application/json"
The above command returns JSON structured like this:
{
    "id": 43,
    "created_at": "2019-11-11T16:22:58.024-08:00",
    "completed_at": null,
    "portal_name": "MY PORTAL",
    "verified_expires_at": null,
    "deal_name": "MY DEAL",
    "verification_request_step": "accepted_by_investor", # Deprecated. Please check the "status" parameter instead now.
    "api_type": "embedded",
    "identifier": "abc123",
    "investor": {
        "id": 24,
        "first_name": "Investor",
        "last_name": "One"
    },
    "status": "accepted_by_investor",
    "legal_name": "INVESTOR ONE"
}
The headers shown to the right are required for each API request. Replace API_TOKEN with the API token you generated on your settings page on VerifyInvestor.com. Use this endpoint to get a list of all verification requests for your issuer account. You can optionally include the type parameter to return verification requests for a single API type or the identifier parameter to return only requests you have created with that particular identifier value. Possible values for these parameters are shown below. The default is to return all verification requests. To get more detail about a single request, add the verification request ID to the end of the URL.
Get All Verification Requests
GET /api/v1/verification_requests
| Optional Parameters | Possible Values |
|---|---|
type |
regular OR lite OR embedded OR all |
identifier |
any string |
from_date |
date in yyyy-mm-dd format |
to_date |
date in yyyy-mm-dd format |
Get One Verification Request
GET /api/v1/verification_requests/:vr_id
The following statuses are possible for verification request created through the Embedded API.
| Status | Explanation |
|---|---|
accepted_by_investor |
The investor has accepted the verification request but has not yet completed it. |
waiting_for_review |
Investor has completed the request, and it is now in the reviewers' queue. |
in_review |
The verification request has been assigned a reviewer and is under review. |
accredited |
The investor is verified as accredited. |
not_accredited |
After review, it appears the investor is not accredited. |
waiting_for_information_from_investor |
The reviewer has requested additional information from the investor. |
accepted_expire |
The verification request has expired. The investor accepted but did not complete. |
declined_by_investor |
The investor has declined the verification request. |
self_not_accredited |
The investor has accepted then canceled the verification request. |
Sample status history included in the verification request JSON response with ?status_history=true:
"status_history": {
  "2024-03-26T09:14:11-07:00": "waiting_for_investor_acceptance",
  "2024-03-26T09:14:28-07:00": "accepted_by_investor",
  "2024-03-26T09:14:41-07:00": "waiting_for_review",
  "2024-03-26T09:15:14-07:00": "in_review",
  "2024-03-26T09:15:25-07:00": "waiting_for_information_from_investor",
  "2024-03-26T09:15:55-07:00": "in_review",
  "2024-04-11T12:28:17-07:00": "accredited"
}
Status History
To include a history of all the status changes on the verification request, add status_history=true to the query string. The response will include a status_history hash with the ISO8601 timestamp of each status change as the keys and the statuses as the values.
GET /api/v1/verification_requests/:id?status_history=true
Webhooks
We can also send updates to a POST endpoint on your site every time the status of your verification request changes with our webhook feature. See the webhook section of our Regular API docs for more information. Webhooks sent for Embedded API requests will have an additional field.
"embedded_api": true
The identifier field will be populated with the value you set in the verifyInvestor function and renamed:
"eapi_identifier"
There is also an additional trigger that sends a webhook when a verification request is created in response to an investor initiating the verification process on your website. Webhooks triggered with this event will populate two fields differently from other triggers:
"action": "create_verification_request"
"verification_status": "created"
Webhooks can be fired manually with the following endpoint to return the current state of the verification request.
GET /api/v1/verification_requests/:vr_id/webhook
This is a different endpoint than the one described in our Regular API docs. That endpoint requires a user ID and will not work for the Embedded API.
Certificates
Request certificate:
curl GET "https://www.verifyinvestor.com/api/v1/verification_requests/43/certificate" \
  -H "Authorization: Token YOUR_API_TOKEN_HERE"
If your investor is successfully verified, both you and your investor will receive an email with an attached verification certificate, which is also available from your dashboard on VerifyInvestor.com. You can also download verification certificates via the following endpoint using the ID of the verification request.
Note: Investors verified through the Knowledgable Employee or Officer methods are restricted to participate only in the specific fund in which they are a knowledgeable employee or officer. As a result, these methods produce unique certificates that specify the company and deal name. Please double-check the certificate names to ensure they match your specific fund.
GET /api/v1/verification_requests/:vr_id/certificate
| Response Code | Meaning |
|---|---|
200 OK |
Certificate found |
404 Not Found |
No certificate found |
Billing
Pull verification request counts for for billing purposes:
curl -X GET "https://www.verifyinvestor.com/api/v1/billing?from_date=2023-01-01&to_date=2023-01-31" \
  -H "Authorization: Token YOUR_API_TOKEN_HERE" \
  -H "Accept: application/json" \
Sample response with only Embedded API enabled:
{
  "from_date": "2023-01-01",
  "to_date": "2023-01-31",
  "embedded": 23
}
Sample response with all API types enabled:
{
  "from_date": "2023-01-01",
  "to_date": "2023-01-31",
  "regular": 5,
  "lite": 9,
  "embedded": 23
}
The following endpoint returns verification request counts for billing purposes.
GET /api/v1/billing
Query Parameters
| Parameter | Default | Description |
|---|---|---|
| from_date | Earliest date | Optional, date in yyyy-mm-dd format. Data is pulled from the beginning of this date. |
| to_date | Current date | Optional, date in yyyy-mm-dd format. Data is pulled through the end of this date. |
The parameters from_date and to_date are optional. The date should be in yyyy-mm-dd format.
If the from_date parameter is missing or unparseable, all data will be included up to the to_date. If the to_date parameter is missing or unparseable, data will be included from the from_date to the present. If neither parameter is present or parseable, all data will be included.
If you have multiple API types enabled, the response will contain a count for each type. This endpoint returns only verification request counts. Specific pricing information is available on request.
Simulated Review (staging servers only)
Simulate a review as accredited:
curl -X POST "https://verifyinvestor-staging.herokuapp.com/api/v1/verification_requests/90/review" \
  -H "Authorization: Token YOUR_API_TOKEN_HERE" \
  -H "Content-Type: application/json" \
  -H "Accept: application/json" \
  -d '{
        "status" : "accredited"
      }'
Example response for a success review:
{
  "id":135,
  "status" : "accredited",
  "legal_name" : "LEGAL NAME 1",
  "dashboard_status" : "accredited",
  "investor":
    {
      "id":90,
      "verification_status":"verified"
    }
}
Example error when simulating a review:
{
  "error": "Incorrect or missing params provided."
}
POST /api/v1/verification_requests/:id/review
Automatically reviews a verification request completed by an investor. The
verification request must be in "waiting-for-review" status. The
id is the id returned when creating a new verification
request.
| Parameter | Default | Description |
|---|---|---|
| status | Please provide one of the following: accredited, not_accredited, need_more_information. |
| Response Code | Meaning |
|---|---|
201 Created |
Verification request review succeeded |
404 Not Found |
User does not exist, or has not authorized your application |
403 Forbidden |
Request couldn't be processed, likely due to an incorrect status being passed or the verification request has not been completed by the investor |
Support
If you need assistance setting up the VerifyInvestor.com Embedded API on your site, please contact support@verifyinvestor.com. If you have any technical questions, please contact development@verifyinvestor.com.